In This Chapter
Climbing Debug Mode - What’s Under The Hood
Thanks to MelonLoader modders were able to enable the developer debug mode. This provides PC players access to a variety of developer settings, but the main focus is the ‘Climbing Debug Overlay’. This overlay displays a variety of information pertaining to the climbing mechanics engine at play. While the specific pieces of data displayed are customizable, the most comprehensive quantitative settings shows the following:
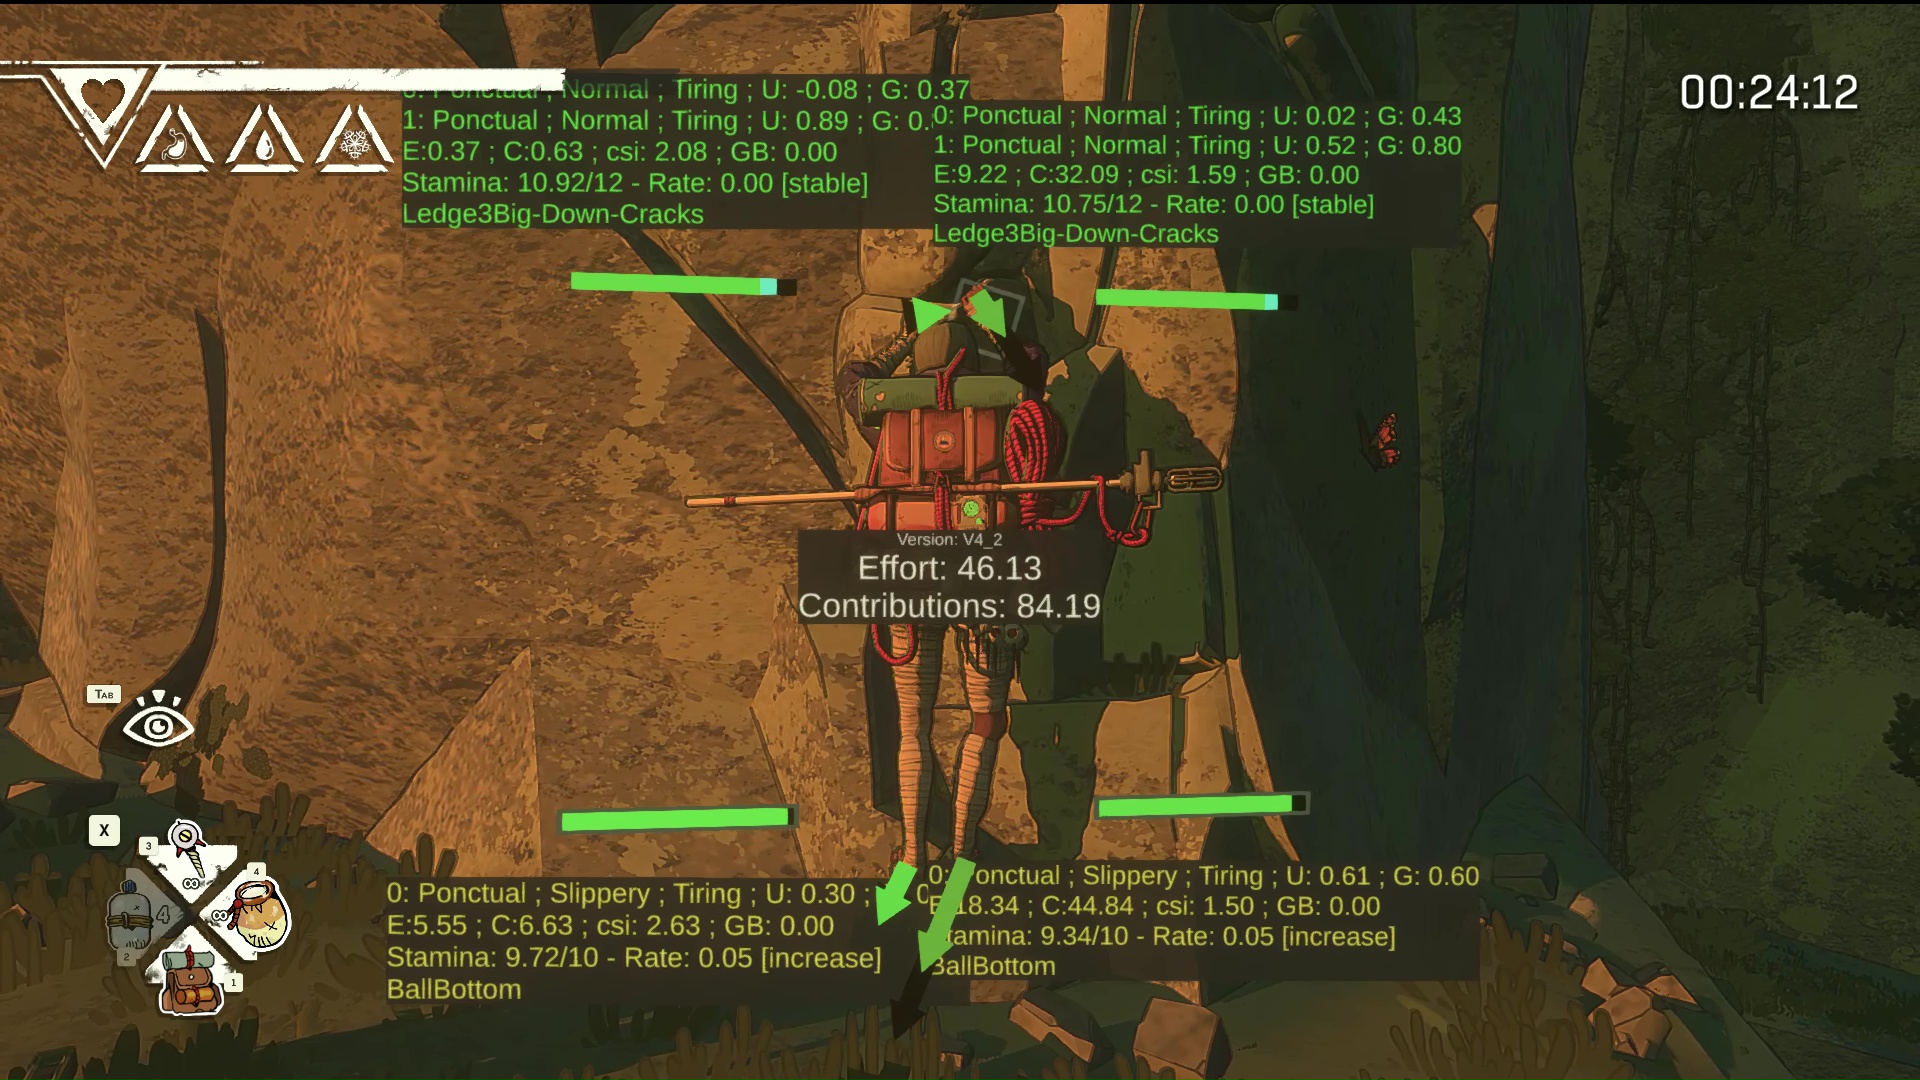
There’s a lot going on in that image, so let’s break down what we’re seeing specifically:
Center Box:
-Effort vs Contributions: The game engine runs a continuous calculation balancing the combined effort needed to maintain holds across all four limbs against the support that effort provides. This center box shows these combined values for each side of the equation. Contribution here is simply a sum of the corresponding values of each of the four limbs. Effort is a bit more complicated- it is also a sum of its corresponding values, but Aava’s overall position is also used to positively or negatively affect the final value. That is- if her body position is off centered or affected by the slope (such as an overhang) the total effort value increases beyond the sum of the individual effort of the limbs. For really bad positions this final value adjustment can be quite large. Conversely, a centered position on a vertical or positively sloped face lowers total effort, but only a small amount. From this data and simple intuition we know that when C > E, Aava is in a stable position that could lead to full stamina recovery (also called a ‘Full Rest’) and conversely E > C would mean she is in a compromised, overall stamina negative situation and will eventually fall. This variance in the total effort does not immediately impact the effort / contribution calculation for the individual limbs- it serves as an indicator of the trend of that position if no adjustment is made.
Per Limb:
-Ponctual: Not fully sure on this- unlike the other terms present in this first line, when a limb is on a hold ‘Ponctual’ never changes. The best guess is this is short for the French term “contact ponctuel” which means “point contact”. More simply it’s just saying “this limb is on a hold”.
-Quality of Hold: ‘Normal’ vs varying degrees of Slippery (‘Slippery’ vs ‘VerySlippery’). I’ll get into the Hold Feedback indicator more later, but it’s worth noting that when you are on a good hold you always have ‘Normal’ for the condition of the hold. An exception here is when it’s raining- very rarely a ‘good hold’ will still classify as ‘Slippery’, but never ‘Very Slippery’. The two different states of slippery add a (currently unknown) chance for that limb to slip off a hold. Chance to slip is not just affected by the condition of the hold, but by the angle of that hold relative to her center of gravity / torso and the effort that hold requires. More effort, more angle = higher chance to slip. This chance to slip also seems to increase heavily when moving other limbs.
Another important aspect of hold quality is the effect on stamina consumption. A ‘Normal’ hold burns stamina at an unmodified or base rate based on Aava’s overall position and the particular hold. A ‘Slippery’ or ‘VerySlippery’ hold adjusts another modifier value we’ll discuss shortly (‘csi’) that increases the effort that limb needs to spend to stay on the hold. There is no set increase by type (Slippery / VSlippery), it’s hold and position specific, but a bad hold quality almost always carries an additional stamina burn rate penalty. Lastly, ‘Normal’ holds communicate the least finger damage vs the other types.
-Stamina State: Comfortable, Tiring, Very Tiring. This is simply stating the status of the stamina for that limb. ‘Comfortable’ is recovering stamina at a decent rate, while ‘Tiring’ covers both slight drain or gain depending on her overall position, and lastly ‘VeryTiring’ expresses consistent, heavy stamina drain. The actual numerical rate values vary by quite a bit within each of the ‘Tiring’ categories. Stamina recovery rate is typically quite slow unless a “Full Rest” state is achieved, in which she completely recovers stamina in just a few seconds.
-’U’: The ‘U’ value is a measure of the angle of the contribution of that hold. This angle is important as while gravity is pulling her straight down, the angle changes the actual amount of contribution from that limb- a more extreme angle away from vertical, the more effort required and less contribution that hold provides. A hold where she is pulling sideways will take more effort to generate a certain contribution compared to a hold where she can be pulling straight down, directly in line with gravity’s pull. You may have noticed that on her left hand hold, one of the values for ‘U’ is negative. This is because she’s pushing up slightly with that part of her hand.
-’G’: The ‘G’ value is a measure of Grip. This value informs the condition (‘Normal’ vs ‘Slippery’) and again is used as part of that limbs Effort vs Contribution calculation. The higher the value, the more friction and the more Contribution you get per amount of Effort. Grip directly serves stamina rate. More grip = less stamina drain.
-Hands vs Feet, 0: & 1: - You may have also noticed that the data boxes for Aava’s hand holds each have two lines (0: & 1:), while the foot holds just have one (0:) This is because the game actually models two points of contact per hand. Palm and fingers essentially. While each arm still only has one stamina bar the two parts of the hands have separate values for condition, state, U, G, etc. Depending on the type of the hold the values can be similar or vary quite a bit. Examples would be she has her hand flat on a slab, both the palm and fingers readings are similar- conversely on a diagonal sloping crack her palm and fingers push 90 degrees from each other and the angle of force relative to straight down create very different values for the 0: and 1: hold points. Whether the final stamina result of an arm is a 50/50 split between the two parts of the hand or if that ratio changes based on another modifier or system is yet to be understood.
-’E’ & ‘C’: Next up are just the base numerical values for Effort and Contribution, per-limb. Nothing really to note here that hasn’t already been discussed.
-’csi’: This is one of the most important values in each limb’s info box. ‘Csi’ adjusts the grip of that limb’s hold, taking into account many of the factors we’ve discussed, such as Aava’s overall center of gravity, torso positioning, the type of hold, how that limb is attached to the hold, and the angle at which she’s attached to this particular hold. All those aspects are effectively distilled into a modifier that determines the final effort value of that limb. When moving through certain positions, good and bad, we see that ‘csi’ rises in straining holds and tenuous positions,and lowers when she’s in a comfortable position.
-’GB’: This value I’ve come to call “Grip Bonus”. It is a fixed value based on the status of buffs. If she does not have any active buffs or chalk, the value is always 0.00. The “Grip” buff changes this value to 0.75. Chalk makes the value 1.5. Grip and Chalk do not stack, the best grip related buff is having chalk active and caps GB at 1.50. This modifier serves to directly counteract a high csi value and decrease the amount of Effort per Contribution in all cases.
-’Stamina’: Simply a numerical representation of the Stamina Bar. Hands have 12 stamina, Legs have 10. Legs seem to be more resilient to stamina drain and also more important to an overall good position, but the reason behind the different values is currently unknown.
-’Rate’: The rate of stamina gain or loss for that limb, simple stuff.
-The type of hold/part of foot: The game categorizes all holds into specific types- ledge, crack, etc. for hands and for feet- it expresses the specific part of the foot being utilized in the hold. The types are fairly common, but despite similar names many holds behave quite differently. The type names are less important than just looking at her hand or foot and building up a familiarity with how a specific type of hold will affect her. Based on the above information- an intuition can be built where the big, level holds offer lots of safety, and narrow vertical cracks or far, acute angled edges and slabbing offer very little. The type of hold can change in the exact same spot if you change her body position or the angle you’re approaching that hold with a particular limb.
“So what?” you say.
“That was a lot of nonsense.” …Indeed.
The numbers under the hood are only mildly interesting and while they do shed light on why a lot of the techniques work- no one climbs with the Climbing Debug overlay up (or do you?) We need to take the lessons from our data analysis and realize it is there simply to serve an already deep practical understanding of gameplay and climbing ‘tech’. Going forward the discussion switches to actually playing the game, but with the assumption that you now have a basic understanding of how the game calculates Aava’s climbing.